Tag Archives: Dress

Chapter Two- Let The Planning Begin!

The purpose of making the corset toiles was to get a decent base shape to work with, both on my own living body and for the paper tape form we finished tonight.

I’m happy to try my hand at a couple more corset toiles to get it perfect but I needed a good enough base to make a new dressmakers dummy. Part of the design will be draped on the form and my old one is much bigger than I am after weight loss- so a new one was an absolute requirement.

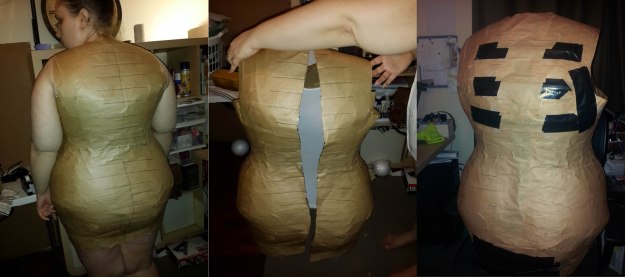
MrT is a kindred spirit, we both love “projects” and he’s usually happy to help me out. This is my third body clone with him as the paper tape draper and things went very speedy- from start to finish he had it done in just over an hour and a half.

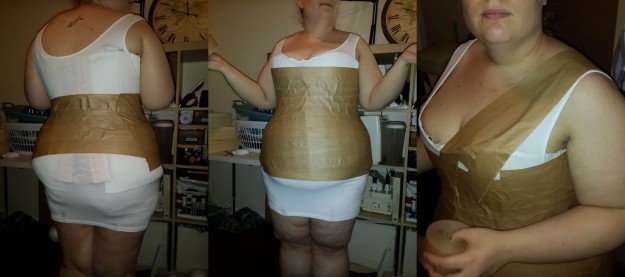
I wore the white corset toile under an old long-line white singlet (which was sacrificed in the process) and we used brown gummed paper tape. It’s 48mm wide and there’s a heckuvalot on a roll. For the princely sum of $15- it’s an affordable experiment.

Let the wrapping begin!

Let the wrapping begin!

I followed some advice from The Sewing Forum about using something like a meter ruler to alleviate some of the belly-pooch-fitting-troubles but got creative and used some of the leftover cable ties instead. It worked a treat! Such a good suggestion- used in a slightly different manner- with excellent results. You can see the idea in action below.

Smoothing out the pooch!

Smoothing out the pooch!

Once the first layer was covered MrT went over the whole form twice more, paying attention to key areas like the shoulders, the hem and the waistline. We stopped with about 5m of tape left on the roll so we could cut me out of it. He marked the centre back, then some horizontal lines at 5cm intervals so I could match it back up. Once it was off I used gaffer tape to stick it back together- it has greater holding power at this stage! Then I covered the black tape with the last of the brown paper tape so it looks nicer. Here’s some of the final pics we snapped of the process.

Mark Cut and Stick it back together

Having the form done is a HUGE weight off my mind. It might not be perfect, I might still change my mind about an underbust/overbust corset- but the main points of waist, hips and pooch have all been taken into consideration with this form. If I decide I want to wear an underbust corset with a bra I can always stick a bra over the top of this form for boobs… or make another one for the cost of another roll of paper tape and a singlet *shrugs*.

It’s currently swinging on a coat hanger but I will be plopping it on top of an old TINY dressform once I fix the base.

I am relieved and exhausted at the moment. It’s a rewarding process and I will do it again but it takes a lot out of you- not being able to move!
Chapter One- We’re Getting Married!

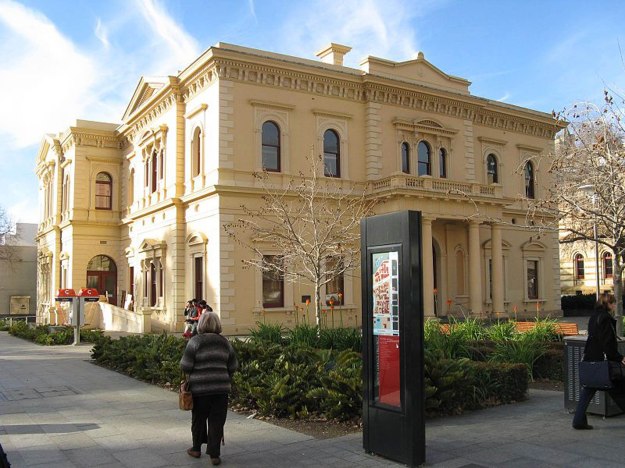
Mr Thrifty proposed in July- we’re finally getting hitched. We’ve settled on a date of July 5th, 2014 and we’re having our wedding and reception at The Circulating Library in South Australia (hence the Chapter One title, get it?!).

Institute Building SLSA

I’ll be posting a few of the things we’ll be DIY-ing for the wedding, the most notable of course will be my wedding dress! OMG! Huge undertaking! Scary! Exciting! Challenging!

I went fabric browsing with my mum last week just to see what’s out there for bridal laces, fell in love with one of them which solidified the design I had in my head. I spent the week tweaking the sketches, making sure I knew how much of the luscious (read: expensive) lace I’d need then went back and bought a length of it this week.

Beaded Tulle Lace

Beaded Tulle Lace- Large Motif

With the design somewhat decided (there’s always room for minor changes as it comes together) I figured I should start my own “Wedding Dress Saga” post for you all to follow along. We’re getting married on July 5th, so there’s about 6 months worth of work for me to share.

The design is for a fit-and-flare silhouette, featuring large lace appliqués and a few draped panels across both front and back. There is a bustled “pouf” around the knee which sits above an a-line tulle skirt. The straps or sleeves will be decided as it nears completion but I would like the back neckline to end in a V at the top of the zip/button closure.

Wedding Dress Sketch

So far I’ve been playing around with a corset pattern in order to get a good shape for the body of the dress. I’ve chosen the Freedom Corset from Bra Makers Supply. Some of the reasons for using this pattern is that it comes in my size, it’s quite full coverage and it has two variations- an overbust and and underbust corset in one package. I ordered it via etsy and it arrived in about two weeks (Canada to Australia).

The first one I made up was too big. I didn’t take my waist reduction into account so the lacing panels were touching and I had very little to show in the way of compression or support.

Corset Toile One FSB

The next version I made up as an underbust but lengthened below the hip to contain more of the belly pooch but I realised I do want an overbust. I don’t want to wear a bra and worry about my shoulder straps (no photos, it went in the bin).

The last version I’ve made from blockout curtain lining at $4AUD per meter (£2ish) and I am finally starting to get somewhere. It’s two sizes smaller than the first and long enough to contain the belly. I’ve drawn a few lines on the toile to show where I’d change the lengths but overall, for a toile, I am very happy with it. Oh, please excuse the serious slanting! The fabric was cheap, most likely very badly off grain, and you should never lace a corset as tight as I did on the first try, oops!

Corset Toile Two FBS
Anyways! With the corset portion somewhat sorted I will be roping MrT into helping me make another brown paper tape dummy over the top of the corset so that I have an accurate dummy to work with, my old one is now too fat (yay!). Fingers crossed we might get to that stage tomorrow, otherwise it has to wait another week!

Other than that I need to figure out my order for corsetry supplies and get that going so that it arrives with plenty of time to spare. As far as I can tell it will be cheaper for me to order from the UK and have it shipped- and I’ll be ordering extra boning and such for the wedding dress as well.

Phew- long first post! Hopefully the next few will be shorter. Ha!

Simplicity 1612 – Another Summer Dress

S1612_Planning

I bought two patterns from Simplicity during their last online sale and this is the second pattern from that purchase. The pattern is Simplicity 1612, View A. It’s a knit dress pattern with a twisted front detail at the bust, a twisted back panel, cap sleeves and view A finishes at the knee. I used a retro white/orange/brown printed poly knit that’s been in my stash for yonks. I remember loving it at the time but then I realised the print ran the wrong way (selvedge to selvedge not lengthwise) and it ended up buried in the cupboard. Time to stash bust! 

S1612_FinalDressThe pattern went together easy enough, from cutting to hemming it took me an afternoon, about three and a half hours. I was anticipating some modifications so I didn’t use my nicer fabrics. It was made in a size 26W and for something straight out of the packet it’s turned out well enough to wear around the house BUT you can see my bra at the back so I won’t be wearing it in public. That’s the biggest change I need to make to the paper pattern if/when I make this up again ‘cuz my bra is visible and that’s not a good look! The twist at the bust worked out much better than I thought it would. It covers enough of my chest so that the front of my bra is covered but it’s still a nice steep v-neck. 

On to the list of modifications, none of them are essential but I like to aim for better each time I make something. I will add extra width to the lower inside curve of the back twisty piece and shift the notches on the skirt to match. I will probably cut about 5cm off at the hem to have it sit at or above my knee, it’s a touch too long at the moment (or alternatively I will make it a maxi!). The next time I make it I will shift the shoulder seam back by 1-2cm, I think it sits a bit too far forward. I’m also considering combining the back skirt and back twist panels into one simpler pattern piece for a faster style option. I like the waist shaping through the back so I’d leave the centre back seam. I know that sounds like a long list of changes but they’re all so minor and they will be quick to do. S1612_FSB

I wanted to break this up into a few posts but life has been a bit messy of late so I’m just putting up the finished project.

Simplicity 1800- The Finished Dress

S1800_FinalThe dress is finished and I absolutely love the style. I’d happily make two or three more to see me through the summer. I’m glad made the necessary changes to the paper pattern before cutting in to the fabric. I’ve ended up with a great pattern I can re-use and know it’s going to fit just as well as this dress does. The drape and weight of the fabric is perfect for this style, it’s so comfy and cool to wear. It is a bit bright compared to what I normally wear so I am considering hunting down a cropped short sleeve cardigan in red to wear with it while I get used to seeing myself in something other than solid colours. I discovered I have a pair of shoes that match the dress almost perfectly. How cool is that?

2013-09-22 10.09.49I changed the pattern to a lined bodice and sleeves instead of using the facings. I like how the edges of the neckline and sleeves are finished because of the lining. There is one thing I’d tweak next time around (and there will be a next time!) and that’s the curve of the princess seam. It’s a little bit pointy and sits a bit low, a smoother and higher curve would suit me better, I think.

S1800_FinalFBS

BurdaStyle Francesca Toile #1

First toile made and pattern modifications have been noted down so I can alter the pattern pieces today and cut a second toile.

Bustrastyle Francesca Toile 01

I need to let it out (more than I thought I’d have to) across the hem, I’ve split it open down the front and back to give me an idea of how much I need to add. I’ll add it evenly throughout the panels. I think a total of 16cm will be enough.

I need to add some length to the front bodice and remove some length on the back bodice- the band under the bust is tilted. Fingers crossed- removing some length on the back bodice and adding some width will be enough to remove, or at least minimize, the wrinkling you can see on the back skirt panels (I’m sure some of the wrinkles you can see is just from bad pinning).

might lower and widen the neckline a small amount. It’s a nice height now without the contrast detailing but if I’m adding more fabric with the contrasting bust panels I can do with enlarging the neckline.

I haven’t added the sleeves to this toile and I’ve left off the contrasting fabric too. I will add the sleeves to the next toile but I think I’ll skip the contrasting fabric again, it’s not needed for tweaking the fit.

I’m going to transfer all the alterations to the pattern pieces today and if I have time cut out the second toile. If all goes well I should be able to sew it up by tomorrow and then go fabric hunting this weekend for the final version. I’ve already seen some gorgeous printed cotton voile online and I’m hoping they have it in store.

As pointed out on The Sewing Forum, I do have wonky shoulders and I know I need to fit for that. Generally I just pin out the excess just before I insert the sleeves but someone made the suggestion of using a small shoulder pad. It’s something I’ll mill over while I make the next toile.

Sheath Fitting Garment Take 3

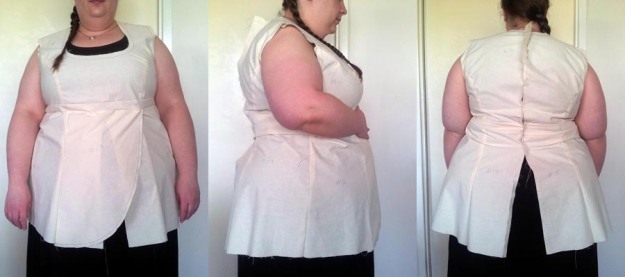
I am up to the third fitting garment drafted using PatternMaster Boutique. I got an email back from Karen with some adjustments to make and the most notable change was raising the waistline. She also let me cut it shorter to save on wasting fabric. Just in time because I am down to the last couple of meters of calico and the new bolt hasn’t arrived yet. The changes are small but they do make a difference in how it fits.

I printed it out, stuck it together, sewed it up and I am pleased with the changes. Raising the waistline has made a big difference to the shaping along the centre front, it’s much more flattering as you can see. There’s still some issues to address. The waist still “feels” a bit too big but if I pin it in any more it starts to sit in my folds of fluff which isn’t attractive! The front neckline is way too high. I had to clip in to the neckline to get it to stop choking me and the shoulders are too high at the neckline, they point up to my ears. I think the neckline and shoulders are linked somehow. There is still that funky fold/drag line from the front waist dart to the tip of the back waist dart. The front waist is higher than the back, same with the hips.

I got a few back and forth emails from Karen last night about the chart. The adjustments to the front shoulder slope hadn’t “stuck”. I had entered 48.8cm but the program chopped it down to 47.5cm. There are a few glitches in the program because of imperial versus metric measurements.

Karen suggested unpicking the shoulder seam and some of the sleeve cap and raising the shoulder point by 1cm. That means the seam allowance would be 5mm at the shoulder point and 15mm at the neck. That was an easy fix and meant I didn’t have to cut another one. The adjustments did wonders for the fit. It’s choking me less at the neckline and I *think* the strange diagonal line I have across the side seam was reduced as well. The only ill effect was the bust point seems lower now but I can change that in the next one.

If anyone has noticed- yes I am lopsided. My right shoulder point is a good inch lower than the left which makes things like back zips take a dive to the right. You can see the drag lines pointing to the right shoulder at the front as well. I usually fiddle with that after I’ve cut the fabric out by removing 5-10mm from the shoulder and sleeve but for the fitting garment I’m ignoring it until it’s at the last stage.

I’m having some troubles with the new front and back shoulder slope measurements not “sticking”. They seem to be dropping back down every time I save it and I don’t know how to fix that. Again, I think it’s an imperial-to-metric conversion bug. It’s Thanksgiving in America so I won’t hear back from Karen until Friday night or Saturday my time. Oh well, I was waiting for the calico to arrive anyway!

Sheath Fitting Garment Take 2

I’m back at work trying to perfect my sheath fitting garment created in PatterMaster Boutique. This is the second draft following Karen’s adjustment advice.

The pattern looks a bit better now that I’ve repositioned the bust point and entered the new waist measurement. It doesn’t look anywhere near as odd as the first one did. I made sure to select TWO front and back waist darts this time around to avoid the pleat effect I noticed last time. I printed off the pattern on the A3 printer (best investment ever for print at home patterns!) and taped the pages together.

Rinse and repeat from last time. I cut it out in calico and sewed it all up then tried it on. It is a big improvement on the first one but still not there yet. I sent another email through to Karen with the photos and the summary sheet. I included some of my own observations, even though she can probably tell from the photos what’s wrong.

There is still some excess around the side waist and a big fold from the front waist dart to the side seam.
If I pinch out the excess (removing 2.5cm vertically along the waistline from first front dart to first back dart) it sits nicer. Does the waist need to be raised? If I take a “waist” measurement closer to my bust (a hand span under the bra band) there’s a 10cm difference but that does seem awfully high up. I could use some guidance here, I don’t know what to do! The neckline is a little too high at the front and a little too deep at the back but I think I can fix that myself. The neckline also sits away from the shoulders like the slope is too steep? It sits on the shoulder point but angles up too high at the neck. It’s also quite wide from left to right.

I know it sounds like a long list of complaints but it is already so much nicer than the first one and I am excited about continuing. Being able to see the results from the changes suggested is keeping me motivated.

I got an email back from Karen a couple of days later (not unusual to wait longer than a day when you live on the other side of the world!). She asked me to tie a piece of elastic around my waist and send her some new photos. That made me giggle- with all the fancy computer programming power- old fashioned methods for finding the waistline are still the most sensible! The elastic showed that the waistline does need to be raised some more. That might make some people cringe but it had to be done. The waist darts should be at the narrowest part of your torso which makes sense when you think about it. It doesn’t mean I have to wear a skirt that high, I can drop the waist height later *phew*.

Karen sent through some adjusted measurements after seeing the photos. She raised the waistline and changed the shoulder slope and width. I’ve made the suggested changes in the software and will write about them in the next instalment!

Sheath Fitting Garment Take 1

Sheath Fitting Garment Take 1

I’ve had Wild Ginger’s PatternMaster Boutique for a few months now but I hadn’t got around to making my fitting garments until recently. For those of you who haven’t heard of Wild Ginger, they make a range of programs which draft patterns to your own personal measurements. I have a bit of experience with pattern-making already but I wanted a lazier simpler option for home sewing. And for those of you wondering what a fitting garment is, it’s a very basic, bare bones pattern, used to correct any fitting issues, which you then use as a base for further fashion patterns. The stylized patterns created from a properly fitted sloper (fit garment) shouldn’t need much adjustment so it’s worth investing the time and energy at the very beginning to avoid tears and tantrums later on.

I put off making the fitting garments for a while because I knew I’d be up for a lot of fine tuning due to my size and shape. If you’ve ever tried to gift wrap a basketball you can understand the type of frustration I expected. In the end I kicked my own butt and set out making the sheath sloper. I was feeling motivated after reading some articles on couture techniques and all those lovely finishes reminded me that I wouldn’t be able to make anything nice unless I did the hard yards first.

I got my mum to measure me the first time and plugged all those details in to the program.

The shape of the pattern pieces seemed a little odd but at the same time I’m not a “perfect industry size 10” so of course they looked strange. The bust dart and the armhole shape are just plain weird when you look at the pattern. I left the settings at their defaults and printed it off on our lovely A3 printer and stuck them on the glass sliding door to tape them all together.

Moving along, I cut it out in calico (muslin for our American friends) and set to sewing it up. One of the things I like about fitting garments is the slap-dash-sewing satisfaction you get (says the woman who only a couple of paragraphs earlier mentioned a lust of couture finishes- lol). You don’t have to hem it if you don’t want, you don’t need to overlock the seams because it won’t be worn as a real garment, you can skip on facings and interfacings and all the time-consuming stuff and you get to focus on the most important issue which is how it fits!

So, how did it fit? Well… it wasn’t a complete failure but it definitely needs some work! Thankfully, Wild Ginger has a wonderful support woman named Karen and Karen is my new best friend while we fine tune the pattern.

This is a fantastic after sale service if you can be patient and it’s worth waiting for her expert advice. I sent her a copy of the pattern summary and photos of the front, back and sides and left the following observations.

It feels a bit too big all over, I can get it on without using the back zip.
The bust point seems too high and I’m at the maximum horizontal position.
The waistline isn’t even, it’s higher at the front.
I can pinch out heaps of fabric at the waistline on the side seams, easily 15cm (6 inches?).
The darts at the front waist are leaving huge pleats, should I use two instead of one.
The sleeve and underarm don’t feel tight but the head is twisting to the front.

The reply I got back asked me to check my measurements and sure enough they were out by a fair whack at the waist. She also mentioned where to find the bust dart vertical position setting and how to measure for that. She told me how to correct the sleeve head twisting and changed some of the waist height measurements as well. And yes, I should be using two waist darts, not one!

I’ve made the suggested changes and will write about them in the next installment!