Cutting out patterns is one of those things that doesn’t need to be so tedious. Pinning out paper patterns is a pain! Have you ever considered weighing patterns down instead? You should!
Since college, I have hankered after a set of pattern weights or cloth weights for my own personal use. Unfortunately, like a lot of the cooler items I used during my course, metal pattern weights (like these, or these) are not available on the retail market in Australia and the cost of shipping them here from overseas is crazy.
You can buy home-use sets which are basically small metal washers with a nylon coating- or you can raid the pantry for tins of food. They’re all adequate substitutions- but to me, it felt like I was being “cheap”, not “thrifty”. Being thrifty is about doing a good job with limited resources. I wanted to look forward to laying out my patterns and perhaps feel a little extravagant when using them.
After some brainstorming with Mr Thrifty, we headed off to our local Bunnings hardware store for supplies. My first stop was metal washers. I’d seen retail versions of weights using washers as well as DIY tutorials for covering them, but I wasn’t overly impressed by the weight of them or the sizes available. I’m sure they work but they just weren’t doing it for me.
When I explained what I was thinking to Mr Thrifty, he showed me what he had found further down the aisle and I was overjoyed by what I saw! He had found some metal plates or brackets (or whatever the heck they’re called!) similar in size to the small Morplan cloth weights. I will admit, I got a little excited… The smallest Morplan weight is 20GBP, that’s close to 30AUD. My bargain hunting brain went in to overdrive as I scanned through what else they had in that section.
One shelf up and two places across I spotted a wider bracket. It was the same length but twice the width and half the thickness. I grabbed four of the large ones because I wanted to stack two of them together so they were double the weight of the small ones. And I grabbed six of the narrower plates because half a dozen sounded like a decent number to have in my stash.
Cost so far: $37.30 AUD
Technical note: both sizes of the brackets weigh just under 500 grams (1 lbs). The smaller plate is 20cm x 5cm (8in x 2 in) and the larger plate is 20cm x 10cm (8in x 4 in).
On our way home we stopped in at Spotlight (a necessary evil one has to face when needing fabric) and picked up half a metre of “fake quilt” fabric that was $12.95pm. I’m not a quilter and I’m sure a quilt fanatic would frown upon its use but it was lovely fabric and I’m glad I bought it. After Spotlight, we stopped off at one of those discount variety stores and I found a roll of cream coloured grip map for $2.50. Grip matting wasn’t a part of the original plan but it ended up being a nice addition to the finished weights. It cushions the fabric from the hard edges of the metal plates.
Cost so far: $46.25
You know what you need and where to find it, now all you need to know how to make them!
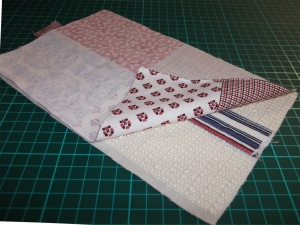
 I used the weights as my guide. I didn’t bother making a paper template. I added 2cm allowance on all sides with the intention of sewing a 1.5cm seam. The extra 0.5cm was needed for the thickness of the metal plate.
I didn’t list it earlier but you will also need half a metre of calico or scrap fabric to back the grip matting. We’ve all got a stash of leftovers to use up and you won’t see much of it through the grip mat.
 For each pattern weight you’ll need:
1 layer of grip mat
1 layer of calico
1 layer of fashion fabric
1 strip 8cm wide for the handle
The first lot of handles I cut too narrow. 8cm seems quite wide but they need to be quite chunky to handle the weight of the brackets.
 For the handles to hold up to wear they’re 4 layers thick and reinforced with topstitching. I pressed the cut edges to the centre and then folded it in half and pressed again.
I sewed down the middle of all of them, then down the left side and then down the right. It’s important to sew in the same direction every time to keep it nice and neat- and to stop the fabric from twisting or warping.
 Layer order from bottom to top:
Calico
Grip Mat
Handle
Fashion fabric
To keep the handle centered you might want to pin the layers together. Sew around 3 sides, leaving 1 long side completely open.
 Turn it through so that the handle is on the top and move on to the next one (if you’re making more than one that is).
I did considered pressing the seams but I wasn’t sure how the grippy rubber would be with the iron so I just left it as is.
The sewing was the same for all of them so I ran off two large and six small “covers” while I was at the machine and made a bit of a production run out of it.
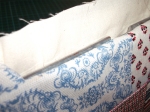
For the bigger weights where I wanted to use two of them stacked together, I made a point to sandwich the seams between the plates. It was a rather snug fit trying to shimmy them down the right sides but it made them very nice and smooth.


I couldn’t do the same on the narrower weights. For those I made sure the seam allowance was to the top so that they had good contact with the patterns on the underside which is the important thing. They’re not as sleek but they still get the job done.
Once you’ve turned them through, slipped in the metal plates, fiddled with getting the seams in the right place and turned the remaining edge to the inside all that’s left to do is hand stitch the last edge closed.
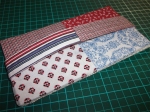
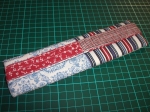
So there you have it. Five kilograms (10 lbs) of pattern weights or cloth weights for less than $50 AUD. The fabric can be replaced if you ever get bored with it or it becomes tatty. The brackets are designed for outdoor use so they will never rust or corrode. Fifty bucks isn’t exactly CHEAP but it’s a long term investment and still a helluva lot cheaper than the real things!
Before I knew how to use weights I would use pins to lay out my patterns. Let me tell you right now, once you’ve got the hang of using cloth weights you’ll never pin again!
You can reposition them without leaving prick marks.
You can aim an industrial fan at your workspace and the pattern will stay put.
You can also use them as hand weights for your health and fitness routine! *giggles*
Technical note: cloth weights work best when they’re about 5cm (2 in) from the edge of the pattern. The extra space allows scissors to slice through the fabric much easier. If you’re using a rotary cutter you can place them as close to the edge as you like.
That’s all from me!
Miss Thrifty


Super cool idea! Love the handle too!
Fantastic idea! I am adding this to my list of things to make.
Great idea. I will be making my own shortly.
Pingback: DIY Pattern Weights | scooterphoenix
I had never even thought of this. What a brilliant idea. Thank you.
Pingback: Tip of the Week – Pattern Weights – Stitch and Pink